 Reviews
 Years Of Excellence



MARCO Artwork - Your Blueprint to Quality Imprints
You're about to place your first order for customized promotional products but are unsure about the artwork and what is needed. Not to worry, ordering your branding items from MARCO is easy! Listed below are tips and guidelines, along with videos, to help you with the artwork process. The answers to commonly asked questions and videos will show you what type of artwork is preferred, how to obtain the correct artwork, and specifications to ensure a quality imprint.
If you already have a question in mind, would like to see examples of artwork or would like to browse our videos, just go ahead and click one of the links below to get you started.
How do I convert text to outlines?
What color imprint should I choose (PMS)?
All I have is a JPEG file of my artwork, won't that print the same as vector?
VECTOR ARTWORK & OTHER ARTWORK GUIDELINES
What is vector artwork?
You may have never heard of it, but don't worry we'll explain exactly what vector artwork is. And, if you're a visual person, just watch the video below after reading through the description to get a better understanding.
Vector artwork is artwork that is made up of mathematical sequences or algorithms that connect points and lines together to form a solid piece of art. Now that we have the technical jargon out of the way, vector artwork is basically artwork that is made up of points and lines that can be scaled up or down without a loss of clarity. Because vector art is made of points and lines instead of pixels the issue of resolution doesn't come into play. This means that an imprint comes out clean and crisp no matter what the size. Later on we will explain situations in which resolution may come up with your artwork.
MARCO Art 101: Vector & Bitmap Art
Learn about Vector Art and Bitmap Art.
How is vector art created?
Vector art is created in a design program such as Adobe® Illustrator or CorelDraw®. You may hear a lot of talk about artwork being created in Adobe® Photoshop but most likely anything that is created in Photoshop is a bitmap file, not vector artwork.
All I have is a JPEG file of my artwork, won't that print the same as vector?
Unfortunately there is a major difference when printing vector artwork vs. JPEG artwork. Because JPEG files are made up of pixels there can often be loss of quality when enlarging or resizing this type of file to print on a product. While on the other hand, when using a vectored artwork file there will be no loss of quality no matter what the resizing is to fit on a product. This means a vectored file can be printed on a small notepad and also enlarged to print on a banner while maintaining the quality and crispness. Below you can see the fine lines of a vectored file vs. the pixilation of a JPEG file.

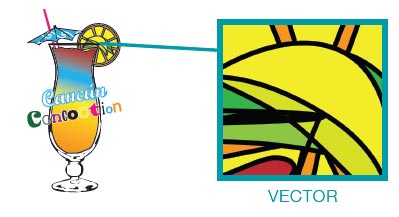
Here are other file types that fall into the same category of a JPEG file, also known as Raster File or Bitmap File. When using these files there can be loss of quality when printing.
.jpg - .png - .bmp - .gif
How can I tell if I have vector art?
If your artwork is already vectored (created in .ai, .eps, or .cdr formats), then drawing a select box around it in Adobe Illustrator will make a bunch of blue lines and dots appear on your art. However, if your artwork is not vectored, then drawing a select box around it in Adobe Illustrator will only create a basic frame WITHOUT blue lines or dots.
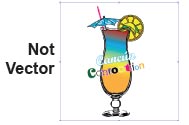
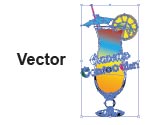
What if I don't have vector art?
If your artwork is not in vector art format, you will need to convert it. It is important to understand that simply re-saving your art as a vector file does not convert it. For information on converting your file to vector art, watch the video below on converting artwork. However, if you don't have the capability of doing this file conversion, MARCO has trained graphic designers who can do it for you! Just speak to your customer service rep about having your artwork converted.
MARCO Art 101: Formatting & Converting Art
How to get your artwork ready for printing.
When is it okay to use a Raster file?
Raster images can be used on some full color products. With using raster images comes specific guidelines, such as minimum resolution requirements. For most full color products the raster image must be at least 300ppi (pixels per inch) AT THE SIZE IT IS PRINTING. So this means that if you are printing an image on a plastic bag with an imprint area of 12"h x 12"w then the raster image must be at least 300dpi at 12"h x 12"w. In the link below, you will find more information on what DPI is required for different full-color products.
What if I have text that I want printed, but I don't have a logo?
Well, you're in luck! We have a full library of industry leading clipart images that are right at your fingertips. All you have to do is select what clipart image you would like and we can do the rest. You can view the full library by clicking the clipart link below, and also take a look at our Artwork Creation and Customization video below.
MARCO Art 101: Art Creation & Customization
Create your own custom logo.
Forget the vector and bitmap files I just want text. How many lines of text can I have?
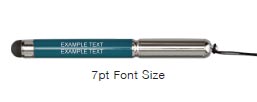
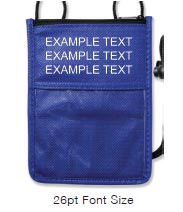
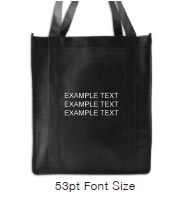
The amount of text information that can be printed depends on the imprint area of that product. Below we have examples of a small, medium and larger imprint area. When printing text there are also minimum font size requirements for each set of products. This is to ensure that all text is legible and can be seen clearly. The point size is shown below each image to give you an idea of what will and won't work.
MARCO Art 101: Text-Only Imprints
All about fonts.
You say my text needs to be converted to outlines because it's "defaulting". How do I do this?
When your text defaults it means that when your artwork is opened on a computer that doesn't have the specified font style it defaults to a standard font. This changes the way your artwork looks and we don't want that happening. To convert your text to outlines you will need to open your artwork in Adobe Illustrator. Then select the entire art piece and hit Shift+Ctrl+O (PC), Shift+Command+O (Mac) or you can go up to the Type menu and select "Create Outlines", and then save. If you're still unsure of how to do this just watch the video above that helps to explain the process and all things font related.
Now that I have my artwork together I'm not sure what color imprint to choose?
At MARCO we use the Pantone Matching System® to select imprint colors, otherwise known as PMS colors. To learn more information about the PMS color system and why it's important to use PMS colors when selecting an imprint color you can watch the video below.
MARCO Art 101: Selecting Imprint Colors
Choosing imprint colors & why PMS matters.
I'm almost ready to order, I'm just unsure of where to place my logo?
Sometimes setting up your artwork vertically works better than having it horizontally. Sometimes its better to have a wraparound imprint on a mug rather than having it print on one or both sides. To get a better idea of how your artwork should be set up, and to see artwork examples, check out the video and link below that shows tips and tricks for great imprints.
MARCO Art 101: Artwork Tips & Tricks
Tips on how to get the best imprints.
How do I send my artwork to MARCO?
There are multiple ways to get your artwork to MARCO. If you are placing an order over the web just follow along with the step by step process. If you place an order over the phone just email your customer care representative or you can email the files to [email protected]. The video below shows how to do this along with other information such as resolution requirements, and file size.
MARCO Art 101: Submitting Your Artwork
Sending artwork for your promotional product order.
After submitting your order you may receive information back stating that your artwork may incur fill in or breaking issues, the text is defaulting, an image is missing, or you need to extend the artwork to fit within a bleed area. You can read into each of these more by clicking on the FAQ link.